VSCode 编写插件
创建项目
先安装官方的脚手架,用来生成插件模板
# 安装脚手架
npm install -g yo generator-code
# 到自己工程目录下
yo code

# 再安装vscode模块
npm install vscode
按照需求创建
参考如下:
? What type of extension do you want to create? New Extension (JavaScript)
? What's the name of your extension? auto-time
? What's the identifier of your extension? UpdateTime
? What's the description of your extension? 用来自动更新Markdown顶部栏的时间,以及新建文档时自动生成顶部栏
? Enable JavaScript type checking in 'jsconfig.json'? Yes
? Initialize a git repository? Yes
? Which package manager to use? npm
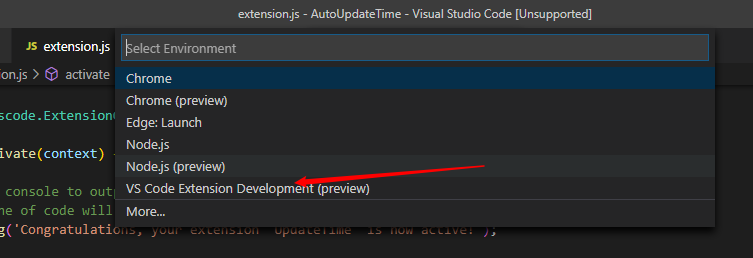
调试项目
调试配置文件写法
.vscode/launch.json文件的写法
点击vscode左侧的debug按钮会在项目的.vscode目录下生成一个launch.json的文件,里面就是用来配置debug信息的
一般有专门的配置环境的插件(例如vscode插件的调试环境就自带了),点击
然后ctrl+shift+p输入helloWorld(contributes.commands里面注册的)就能看到前面的插件写的消息了
package配置信息
大量参考极客教程
生成的package.json有几个关键的配置信息
engines
它指定了运行这个插件需要的 VS Code 版本
"engines": {
    "vscode": "^1.46.0"
  },
activationEvents
这个属性指定了什么情况下这个插件应该被加载并且激活。在我们这个例子里,激活条件是,当用户想要运行 “UpdateTime.helloWorld” 这个命令时,就激活这个插件。 这个机制能够保证,当需要使用这个插件的时候,这个插件才被激活,尽可能地保证性能和内存使用的合理性。
// 注册命令
"activationEvents": [
  "onCommand:UpdateTime.helloWorld"
],
其他的配置选项
// 配置目标语言 例如 onLanguage:javascript 只要打开了JS类型的文件,插件就会被激活。
// * 表示全部语言
onLanguage:${language}

// 启动命令
onCommand:${command}
contributes
"contributes": {
    "commands": [
        {
            "command": "extension.sayHello",
            "title": "Hello World"
        }
    ]
},
这个属性指定了,这个插件给 VS Code 添加了一个 command,这个 command 的 id 是 “extension.sayHello”, 跟 extension.js 中写的一样。而这个命令的名字,叫做 Hello World。
如果不写这个属性的话,VS Code 是不会把这个命令注册到命令面板中的,也就没法找到这个命令并且执行了。
添加快捷键
"contributes": {
    "commands": [
        {
            "command": "extension.sayHello",
            "title": "Hello World"
        }
    ],
   "keybindings": [
        {
            "key": "ctrl+t",
            "command": "extension.sayHello",
            "when": "editorTextFocus"
        }
    ]
},
加入菜单
// 菜单项
// "when": "editorFocus && resourceLangId == javascript"  : 只有编辑器具有焦点,并且打开的是JS文件才会出现
// navigation是一个永远置顶的分组,后面的@6是人工进行组内排序
"contributes": {
    "commands": [
        {
            "command": "extension.sayHello",
            "title": "Hello World"
        }
    ],
   "keybindings": [
        {
            "key": "ctrl+t",
            "command": "extension.sayHello",
            "when": "editorTextFocus"
        }
    ],
   "menus": {
         "editor/context": [
           {
             "when": "editorFocus && resourceLangId == javascript" ,
             "command": "UpdateTime.helloWorld",
             "group": "navigation@6"
           }
         ]
       }
},
插件默认配置
参考资料 contributes.configuration
添加默认配置
很多插件是需要一些额外配置才能工作的,设置默认配置同样在 package.json 里
// 例如下面添加两个配置项
"contributes": {
    "configuration": {
        "type": "object",
        "title": "TypeScript configuration",
        "properties": {
            "typescript.useCodeSnippetsOnMethodSuggest": {
                "type": "boolean",
                "default": false,
                "description": "Complete functions with their parameter signature."
            },
            "markdown.imgArr": {
              "default": [
                "https://image.alsritter.icu/2020/06/19/Nu9RF1.jpg",
                "https://image.alsritter.icu/2020/06/19/Nu9goR.jpg",
                "https://image.alsritter.icu/2020/06/19/NuPfKO.jpg",
                "https://image.alsritter.icu/2020/06/19/NuP226.jpg",
                "https://image.alsritter.icu/2020/06/19/NuPsa9.jpg",
                "https://image.alsritter.icu/2020/06/19/NuPRxK.jpg",
                "https://image.alsritter.icu/2020/06/19/NuPrVJ.jpg",
                "https://image.alsritter.icu/2020/06/19/NuPcP1.jpg",
                "https://image.alsritter.icu/2020/06/19/NuPy5R.jpg",
                "https://image.alsritter.icu/2020/06/19/NuPg8x.jpg",
                "https://image.alsritter.icu/2020/06/19/NuPhrD.jpg"
              ],
              "type": "array",
              // 要加上这个才能在配置页看到 item
              "items": {
                "type": "string"
              },
              "markdownDescription": "在这里随机选择的头图"
            }
        }
    }
}
小提示:配置 markdownDescription 比配置 description 更好,它能呈现 Markdown 格式的文档。
{
  "gitMagic.blame.heatmap.enabled": {
    "description": "Specifies whether to provide a heatmap indicator in the gutter blame annotations"
  }
}
使用 markdownDescription 可以直接在提示使用 Markdown 的语法
{
  "gitMagic.blame.dateFormat": {
    "markdownDescription": "Specifies how to format absolute dates (e.g. using the `${date}` token) in gutter blame annotations. See the [Moment.js docs](https://momentjs.com/docs/#/displaying/format/) for valid formats"
  }
}
读取配置文件
可以用 vscode.workspace.getConfiguration('myExtension') 读取配置值。
const config = vscode.workspace.getConfiguration();
const imgArr = config.get('markdown.imgArr'); // 获取指定配置项
console.log(imgArr);
监听变化
在用户安装了插件后,可能会修改配置,如何实时监听配置项的修改呢? vscode 提供了 onDidChangeConfiguration 事件监听。
vscode.workspace.onDidChangeConfiguration(function(event) {
  const configList = ['includes'];
  // affectsConfiguration: 判断是否变更了指定配置项
  const affected = configList.some(item => event.affectsConfiguration(item));
  if (affected) {
    // do some thing ...
  }
});
命令
访问编辑器
let editor = vscode.window.activeTextEditor;
注意:editor 这个变量并非一定总是有效的值,比如用户现在并没有打开任何文件,编辑器是空的,那么此时 editor 的值就是 undefined。所以, 在正式使用 editor 之前,要判断一下,editor 是否为 undefined,是的话就结束命令的运行。
if (!editor) {
    return;
}
其中api
| 命令 | 作用 |
|---|---|
| document | 也就是当前编辑器中的文档内容; |
| edit | 用于修改编辑器中的内容; |
revealRange 用于将某段代码滚动到当前窗口中; selection | 当前编辑器内的主光标; selections | 当前编辑器中的所有光标,第一个光标就是主光标,后面的则是用户创建出来的多光标;
使用例:获取光标选中的区域
let document = editor.document;
let selection = editor.selection;
// 获取光标选中的区域了
let text = document.getText(selection);
TextEditor
参考官方文档 参考翻译 因为第一个插件是对文档内容进行修改,所以参考TextEditor这一块
其中有两个主要的类vscode.Position、vscode.Range
vscode.Position 用于表达文本编辑器里的位置,其有两个主要的属性:line和character
line: 行号
character:从该行第一个字符开始计数
vscode.Range 用于表达一个 vscode.Position 范围,其有两个主要的属性:start和end
打包
先要获取 应用市场的publisher账号
先安装 vsce
npm install -g vsce
需要获取一个 token,参考官方文档
利用 token 创建一个 publisher,这是在插件市场的用户
vsce create-publisher yourname
本地登录此用户
vsce login yourname
然后
vsce package
# myExtension.vsix generated
vsce publish
# <publisherID>.myExtension published to VS Code MarketPlace
版本升级
可以直接登陆 VsCode 插件管理页更新